

Now through this post, I will Share How to create the cool rollover
button for your website. This tutorial is created to add your knowledge
about photoshop and a little about Dreamweaver cause its very important
for people who want to lesson about web design. If you want to read
this tutorial immediately, you can jump to WORK IN PHOTOSHOP step. But,
I suggest you should look about your project through the following
video :
WORK IN PHOTOSHOP
In photoshop you will trying to create two button, they are normal-button image and hover- button image. normal-button image will appear the first time in website and hover- button image will appear when the cursor there is in above the button so your button look a light as lamp ( you can see the above video too look your project ). Usually, its called with Rollover
- Step 1 : Create new document ( File>New ). Open your photoshop program and create new document with 200X300 pixels and resolution is 72 pixels.
- Step 2 : Create a rounded rectangle. Create new layer ( Layer>New ) and rename the layer with "rectangle". Next, activate the rounded rectangle tool ( look at figure 1 ) with radius is 4 pixels and make sure you have select fill pixels in option bar. After that, create a rounded rectangle using the rounded rectangle tool such us show the figure 2.

-
Step 3 : Add layer style. fill the set background color with dark blue
color ( RGB: #004a80 ) and the set bakground color with black color (
RGB : #000000 ), look the figur 3. Use the gradient overlay in layer
style ( select Layer > Layer style > Gradeint over lay )
and select foreground to background such us shown the figure 4.

-
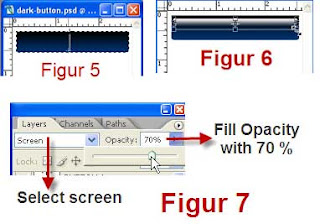
Step 4 : Add highlight in button. Press Ctrl+Click in “rectangle”
Layer to create selection in the rounded rectangle image area .Create
New layer and rename the layer with “highlight”. After that, Fill the
set background color with White color and the set bakground color with
black color. Then, create gradient color in the rounded rectangle image
area such us shown at the figure 5 and then change the size of gradient
be smaller then the rounded rectangle image ( look at figure 6 ). If
you don’t understand, you can see the figure . Next, fill the opacity
with 70% and Change blending mode of highlight layer in Screen mode.
- Step 5 : add “BUTTON 1” text. Activate the horizontal type tool, and type “ BUTTON 1” text in the button such us shown below.

- Step 5 : add “BUTTON 1” text. Activate the horizontal type tool, and type “ BUTTON 1” text in the button such us shown below.

-
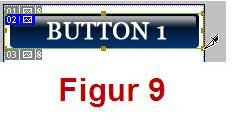
Step 6 : Slice the button image using the slice tool. Activate the
slice tool and then slice the button image such us shown the figure 9.
- Step 7 : export the button image for web document. Select File>Save for Web in menu bar. In save for web window, activate the selection tool ( look at figure 10 ), and select the button you just slice using it ( figure 11 ). After that, select GIF 32 Dithered in PRESET Dropdown menu ( figure 12 ). Next, click SAVE button and Specify the folder to save the button image. Name the button image with normal-button and click Save again.

- Step 7 : export the button image for web document. Select File>Save for Web in menu bar. In save for web window, activate the selection tool ( look at figure 10 ), and select the button you just slice using it ( figure 11 ). After that, select GIF 32 Dithered in PRESET Dropdown menu ( figure 12 ). Next, click SAVE button and Specify the folder to save the button image. Name the button image with normal-button and click Save again.

Note
: make sure you have select image only in Save as type, default
settings in setting, and Selected slice in Slices dropdown menu.
- Step 8 : Create the hover button. The previous step is explain about create button for normal menu and this step will explaine to create button for hover menu. Its simple, just change gradient color in the rectangle Layer using blue and black color. If you don’t understand, here are step-by-step way :
The first, fill the set background color with blue color ( RGB: # 0000ff) and the set bakground color with black color ( RGB : #000000 ). Double click the rectangle Layer to appear layer style window and select gradient over lay. After that , select foreground to background such us shown the figure 4 in step 3. If you have finished, the next step is export the button image for your web document such us shown in Step 7.
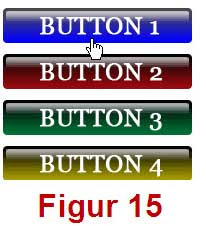
-Step 9 : Create the other button color.With the same way, try to create button 2, button 3, button 4 using gradient color with the following color :
- Step 8 : Create the hover button. The previous step is explain about create button for normal menu and this step will explaine to create button for hover menu. Its simple, just change gradient color in the rectangle Layer using blue and black color. If you don’t understand, here are step-by-step way :
The first, fill the set background color with blue color ( RGB: # 0000ff) and the set bakground color with black color ( RGB : #000000 ). Double click the rectangle Layer to appear layer style window and select gradient over lay. After that , select foreground to background such us shown the figure 4 in step 3. If you have finished, the next step is export the button image for your web document such us shown in Step 7.
-Step 9 : Create the other button color.With the same way, try to create button 2, button 3, button 4 using gradient color with the following color :
- Button 2 : dark red and black color for Normal-button image, red and black color for hover- button image
- Button 3 : dark green and black color for normal- button image, green and black color for hover- button image
- Button 4 : dark yellow and black color for normal- button image, yellow and black color for hover- button image.
WORK IN DREAMWEAVER
- Step 10 : Create new HTML document in dreamweaver. Open your dreamweaver program and create new HTML document. Save ( File> Save ) your HTML document in your root directory.
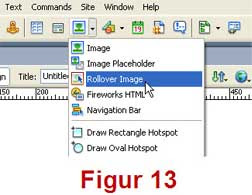
- Step 11 : add rollover Button in your website. The first, we will add the rollover button for BUTTON 1 and next, we will add the rollover button for BUTTON 2 until BUTTON 3. Ok! Here are detail :
Select rollover image in insert bar such us shown in figure 12, Insert rollover image window will appear. After that, fill Original image with normal-button image and rollover image with hover-button image with click the browse button ( look at figure 13 ). The next, check list preload rollover menu and clik Ok button. With the same way, try to add the next button between BUTTON 2 to BUTTON 3
- Step 10 : Create new HTML document in dreamweaver. Open your dreamweaver program and create new HTML document. Save ( File> Save ) your HTML document in your root directory.
- Step 11 : add rollover Button in your website. The first, we will add the rollover button for BUTTON 1 and next, we will add the rollover button for BUTTON 2 until BUTTON 3. Ok! Here are detail :
Select rollover image in insert bar such us shown in figure 12, Insert rollover image window will appear. After that, fill Original image with normal-button image and rollover image with hover-button image with click the browse button ( look at figure 13 ). The next, check list preload rollover menu and clik Ok button. With the same way, try to add the next button between BUTTON 2 to BUTTON 3


If
you have finished. The next, save your document ( CTRL+S ) and then
open your HTML document with your browser. If you doing it correctly,
your document will appear such us shown below :
Tips : to easy understanding this tutorial, you must be patient to lesson this tutorial with many doing action.